
Backcountry Landings
By Sparky Imeson
 Living
in Jackson, Wyo. provides the impetus and the opportunity to jump in
a plane and escape the troubles of everyday life at a backcountry
airstrip. An overnight get away can work wonders in restoring your
desire to get back to the rigors of your lifestyle. But just because
an airstrip is close and somewhat familiar, you can’t neglect
planning and research.
Living
in Jackson, Wyo. provides the impetus and the opportunity to jump in
a plane and escape the troubles of everyday life at a backcountry
airstrip. An overnight get away can work wonders in restoring your
desire to get back to the rigors of your lifestyle. But just because
an airstrip is close and somewhat familiar, you can’t neglect
planning and research.
PLANNING CONSIDERATIONS
Your research should include consideration of the airfield surface – gravel, grass, clump grass, sand or dirt – as it will be affected by the weather conditions. Your flight might be during a period of “severe clear,” but if it rained within the previous two weeks it may have an influence on your ability to land safely.
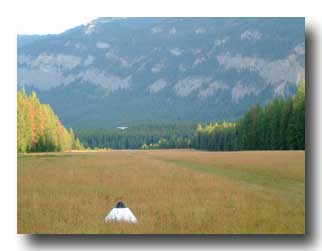 Landing
at Spotted Bear (8U4), Montana
Landing
at Spotted Bear (8U4), Montana
Other elements that impel the pilot to research the airstrip include the gradient of the runway, that will determine the landing and takeoff direction, terrain issues during departure that can create climb gradient problems, the traffic pattern and pattern altitude to be flown, and the optimum approach angle.
 What
resources can you use to familiarize yourself with the operating
procedures and hazards for any particular strip? Galen
Hanselman’s books – Fly Idaho!, Fly
the Big Sky!
(Montana), Air Baja! and his soon to be released book covering the
backcountry strips of Utah – are an excellent resource. Many states
provide aeronautical information in the form of charts and
directories. The web can offer invaluable information. For example,
take a look at
http://www.utahbackcountrypilots.org/ to discover the
wonders that abound in the Utah backcountry.
What
resources can you use to familiarize yourself with the operating
procedures and hazards for any particular strip? Galen
Hanselman’s books – Fly Idaho!, Fly
the Big Sky!
(Montana), Air Baja! and his soon to be released book covering the
backcountry strips of Utah – are an excellent resource. Many states
provide aeronautical information in the form of charts and
directories. The web can offer invaluable information. For example,
take a look at
http://www.utahbackcountrypilots.org/ to discover the
wonders that abound in the Utah backcountry.
If your research doesn’t provide the information for a particular airstrip you want to visit, and you are unable to figure out the approach and departure paths by flying over the strip, it’s time to get the assistance of an experienced pilot to go with you on your first visit. The strip may allow a conventional traffic pattern or the approach may not resemble any pattern you’ve ever been exposed to. Some of the backcountry strips require that you “sneak up” on them and you may not see the runway until you are on short final.
Be concerned with the gradient and location of the strip when it mandates a one-way airstrip. An uphill strip with surrounding mountains can prohibit a go-around maneuver once you are established on the final approach for landing. When committed to land at a one-way strip and nothing is working out, land anyway. The chances of surviving a crash landing after getting the plane on the ground and decelerating is much greater than trying to fly out of the problem and crashing at flying airspeed.
Lean the Mixture
Most of us agree that the mixture should be adjusted for takeoff based on the density altitude (not the physical altitude). Often the density altitude requires that the mixture be adjusted for the landing. This provides adequate power for a go-around and insures the engine won’t quit on touchdown because it is too rich.
Approach for Landing
For operation at those strips where you do not see the landing area until short final it is imperative that you determine the pattern altitude for the final approach. Too high and you have problems slowing down to land. Too low and obstructions get in the way. Just right and you will be able to transition to the spot method for landing once the strip is located.
Approach Speed
 According
to the FAA the optimum approach speed for a short-field approach is
1.3 Vso. This can be adjusted for gusty winds by adding one-half the
gust factor. Notice this is the “approach speed,” that is, the speed
used for maneuvering the airplane to the final approach. It is not
the speed that should be used on short final. Flying at 30 percent
above the stall speed will not only permit the airplane to float
during the flare, it will guarantee the float. This is definitely
not desirable on a short strip where the landing distance increases
as the square of the ratio of the touchdown speed compared to the
normal touchdown speed.
According
to the FAA the optimum approach speed for a short-field approach is
1.3 Vso. This can be adjusted for gusty winds by adding one-half the
gust factor. Notice this is the “approach speed,” that is, the speed
used for maneuvering the airplane to the final approach. It is not
the speed that should be used on short final. Flying at 30 percent
above the stall speed will not only permit the airplane to float
during the flare, it will guarantee the float. This is definitely
not desirable on a short strip where the landing distance increases
as the square of the ratio of the touchdown speed compared to the
normal touchdown speed.
The “over-the-fence” speed will probably be closer to 1.15 Vso. Experiment with the airspeed (remember that it will change as the weight of the plane changes) to find that speed that allows the airplane to touch down in not more than 200 to 300 feet from the point of the flare.
Use of Flaps
Flaps were developed based on the aerodynamic principle that lift and drag are directly proportional. Increase lift and you increase drag. The increased lift experienced with the application of flaps allows the airplane to be flown slower than without flaps, and the increase drag allows the airplane to descend at a steeper approach angle without an increase in airspeed, both beneficial for backcountry landings. If you have flaps, use them.
Spot Method for Landing
Normal flight operations at backcountry airstrips call for landings to be made uphill and takeoffs to be made downhill. Making use of the spot method for landing will eliminate the visual illusions where the pilot’s perception causes a misinterpretation of the approach angle due to the convergence of lines and sloping terrain.
On an upslope runway we form a visual relationship between the altitude and position of the airplane in relation to the sight pattern of width and length of the runway. It is possible (and probable) that we can be deceived when approaching an upslope runway by an illusion of being higher than normal. This leads to a lower-than-normal approach. Problems arise when the density altitude and upslope terrain restricts airplane performance so that the power available may be insufficient to make it to the runway.
We don’t often land “downhill” at mountain strips. Occasionally the wind dictates such a landing. The angle of descent will appear shallower than normal. Our visual adjustment to this illusion causes us to fly higher than normal, generally making it impossible to get down to the strip with the airspeed under control. Many mountain airstrips are located at the confluence of creeks that can funnel wind flow in various patterns. Another advantage of the spot method is that it allows you to immediately detect and adjust for the presence of a tail wind once you are established on final.
Misleading visual cues that create deception can be effectively dealt with by using the spot method for landing, that is, establish and maintain the desired approach speed, align the nose (a windshield mark) with a spot on the runway where the flare will occur, and adjust the windshield mark using the throttle to maintain alignment with the spot. (If this is clear as mud, go to http://www.mountainflying.com/ and review a detailed explanation of the spot method for landing).
Approach Angle
Many pilots are accustomed to and favor the 3-degree glide path provided by an ILS (instrument landing system) when approaching to land. Consider trying the 4.5-degree glide path at your home airport and discover whether or not you have a better view of the approach that makes it easier to make glide path adjustments.
To fly the 4.5-degree glide path, multiply the approach ground speed in knots by 8. For example, a 60-knot approach will be 60 x 8 = 480 fpm rate of descent. Adjust the power to obtain the 480-fpm descent and you will fly the 4.5-degree glide path.
End Note
Incorporating the spot method for landing, with exact airspeed control, eliminates landing problems. Learn the spot method and use it at all airports, not just backcountry strips.
|
|
|