
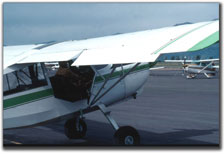
Taildragger Operations

The following contains suggestions that have worked for many pilots to subdue the taildragger.
Rudder Usage
There is no mystery involved in the takeoff of a conventional gear airplane. There are, however, certain elements of ground and flight operations that may require the acquisition of new and more efficient piloting skills and techniques.
The directional control
problems inexperienced pilots encounter during takeoff and landing
of the taildragger most often happen because of the delay in making
a correction when a turn or swerve develops. To make the taildragger
submissive don’t wait until the airplane nose has moved 10 degrees
or more from its lateral alignment. Counteract any turn when the
nose first begins to move. With experience you will develop the
ability to recognize those predictable turns or swerves before they
develop (such as the p-factor induced turn when raising the tail
during takeoff).
The novice pilot usually waits too long
before trying to rectify a swerve. More and more rudder pressure and
often differential braking is required to cancel the swerve. The
pilot uses prolonged application of rudder in the direction opposite
the turn. The overabundance of rudder causes a swerve of greater
magnitude in the opposite direction ... setting the pilot up for a
ground loop.
The
Problem
Taildraggers
(this is actually a misnomer from the early days of aviation when
airplanes had a tail skid instead of a tail wheel) are different
from tricycle gear airplanes. You first notice this difference when
taxiing and making turns. The initial turn from the parking space
causes surprise when the turn continues until opposite rudder (and
maybe some brake) is used to straighten the path.
Taildragger
training requires study of other differences between the
conventional gear and the tricycle gear airplane such as the CG
(center of gravity) being located behind the main landing gear. You
also need to understand torque, p-factor, takeoff moment (downward
force on the left tire causing greater friction), gyroscopic
precession of the propeller (asymmetric thrust), the corkscrewing
effect of the propeller slipstream, weathervane tendency and
centrifugal force. These forces are the culprits that produce the
airplane's tendency to swap ends.
Whenever
operating a taildragger, the experienced pilot remains alert and
wary “until the darn thing is tied down.” The following rudder usage
technique is used to transition from novice to experienced pilot
without aircraft damage.
The
Solution
A beginning
pilot may recognize a swerve, but his reaction time may be too slow
to neutralize the deviation. This may lead to overcorrecting with
the rudders.
With practice the pilot learns to anticipate swerves and makes a
correction before the swerve begins. You will notice that
experienced pilots maintain a straight line during the takeoff.
My greatest success in teaching pilots rudder usage in the
taildragger comes from a technique of pushing on both rudders at the
same time. Use equal pressure against each rudder pedal (push on
both rudders simultaneously), and then move them back and forth,
depressing each rudder about one to two inches. The two-inch
depression will be referred to as the normal deflection.
Align the airplane to takeoff. Suppose we need to push the left rudder a bit for alignment. While the left rudder is pushed, the pressure is maintained on the right rudder. Prior to the desired alignment, lead the turn with opposite rudder.
As power is
applied for takeoff, the rudders are moved back and forth, at a rate
of about one or two depressions per second. This means that if the
right rudder is depressed two inches, the left rudder is immediately
depressed four inches. This is two inches of left rudder to reach
neutral, and two more inches for the normal deflection.
When a turn or slight swerve is recognized, the rudder movement opposite this turn or swerve must be greater than the two-inch normal deflection—perhaps a three- or four-inch depression of the rudder.
Nevertheless,
the technique requires the pilot to go back to the other rudder and
depress it the normal two inches from the neutral position. If the
turn has not been arrested, the greater rudder deflection opposite
the turn is again effected with immediate return to the other
rudder. This procedure cancels the tendency of holding rudder until
the swerve has been corrected but the airplane darts off in the
opposite direction.
Regardless
of the amount of rudder used, it is important to return to a neutral
position before the airplane over reacts and starts a swerve in the
direction opposite the original swerve.
Runway Alignment
Normal takeoffs are made from the centerline of the runway. When taking off with a crosswind, try to align the airplane into the wind. If this requires alignment along the edge of the runway pointing toward the other edge, do it.
Some aircraft designs prevent forward visibility, in which case peripheral vision is used to maintain runway alignment.
Rather than
move your head from side to side, scan the area with eye movement.
This allows faster detection of turns or swerves.
Power Application
During takeoff a smooth application of power is necessary to prevent a swerve to the left caused by torque. Applying power smoothly will also protect the engine from internal damage.
Begin with
the control stick positioned full aft. The heels are normally rested
on the floor. The novice pilot may want to keep his feet close to
the brakes.
Smoothly apply full power (observe power limitations on turbo/super
charged engines). As the speed increases during the takeoff roll,
relax the back pressure, eventually moving the stick forward of the
neutral position to raise the tail. A rapid movement on the control
stick from full aft to forward of neutral will cause the airplane to
swerve left due to engine torque and the gyroscopic precession of
the propeller.
Knowing the order of control effectiveness during the takeoff helps in maintaining control of the airplane. The order is A-E-R. Ailerons are the first to become effective, followed by the elevator, then the rudder. As the rudder becomes effective, smaller corrections (rudder deflections) are needed to control the aircraft’s ground track.
Although
the power application is made smoothly, it should also be made
promptly. Two or three seconds from the idle position to the full
power position should safeguard the engine from damage.
Swerving
If a pilot fails to recognize the beginning of a swerve in time to make a normal correction with rudder usage, the application of the brake may also be needed to straighten the plane.
When a
swerve starts, some pilots have frantically reduced the power to
idle, determined to straighten and stop the plane.
If the aircraft speed is slower than that required for the rudder to
be effective, reduce power to idle and pull back on the control
wheel to place weight on the tail wheel for more effective steering.
Use the rudder, brakes and ailerons as required to regain control of
the ground track.
When the airplane has accelerated to a speed where the rudder is
effective in controlling the airplane and a swerve develops, it is
usually best to leave the power on. The airplane is more
controllable with power because there is a blast of air over the
rudder.
If the speed is fast enough for the rudder to be effective, it is
probably too fast to pull back on the control wheel to place weight
on the tail for better steering. It is undesirable to pull back and
rotate the airplane without sufficient lift to fly. In a crosswind
this will cause skipping and will compound the problem.
If the aircraft speed is close to flying
speed, the application of half of the flaps may allow you to fly out
of the directional control problem. If flaps are used, it is
important to immediately lower the nose to level flight attitude or
slightly above level flight attitude and accelerate before climbing
or retracting the flaps.
Flap Settings
 The
purpose of flaps is to allow the airplane to make a steeper approach
angle during the landing approach without increasing the airspeed.
They do so by increasing the camber of the wing and increase lift.
Because lift and drag are directly proportional, the increased lift
also increases drag. A side benefit of flaps is that they lower the
stall speed and allow for a slower touchdown speed. This also means
that the use of flaps during takeoff will result in a shorter
takeoff ground roll and less exposure to rough ground.
The
purpose of flaps is to allow the airplane to make a steeper approach
angle during the landing approach without increasing the airspeed.
They do so by increasing the camber of the wing and increase lift.
Because lift and drag are directly proportional, the increased lift
also increases drag. A side benefit of flaps is that they lower the
stall speed and allow for a slower touchdown speed. This also means
that the use of flaps during takeoff will result in a shorter
takeoff ground roll and less exposure to rough ground.
Follow the manufacturer's recommendation on how much flap to use. Older airplanes may not have documentation or recommendations on the use of flaps. In this case, move the control wheel or stick to either side for full aileron deflection, then match the flap deflection as closely as possible to the aileron deflection. This will provide the maximum lift for the particular airfoil design of the airplane.
FLAP SETTING FOR TAKEOFF - Make full aileron deflection to one side and match the flap deflection to the maximum aileron deflection.
Technique to Prevent The Ground Loop
The best technique for the new taildragger pilot to prevent a ground loop is the rudder usage technique explained at the beginning of this chapter. Use the rudder and brake as necessary to stop the swerve. The important thing is to neutralize the rudder immediately after the swerve is arrested; otherwise, the plane may swerve in the opposite direction. This is the reason for using the technique of moving the rudder pedals back and forth, with more deflection in the direction that is opposite the swerve.
Do not be hesitant about using the brakes when a swerve develops. The wear-and-tear on the brakes and tires may be less than the tear-and-wear on the airplane if a ground loop occurs.
Using everything available is important. Often the ailerons are forgotten as an aid in controlling the airplane. If the speed is fast enough for the ailerons to be effective in rolling the airplane, roll the wings level or opposite the swerve. This is instinctive, so don’t think about it, just use them.
If the speed is too slow for the ailerons to be effective in rolling the plane, move the control wheel toward the swerve. You will have to think about this because it is not instinctive. The drag that occurs opposite the swerve from the deflected aileron -- lift and drag are directly proportional -- will have more effect than the lift from the aileron at slow speed and will assist in straightening the ground path.
NORMAL TAILDRAGGER LANDING
We established the premise that "the approach is all-important to making a good landing." Consistency is primary in making a good approach.
Downwind Leg
Consistency means flying the same distance from the runway at the same altitude each time.
Base Leg
Using a stabilized approach, that is, carrying partial power to cause an approximate 500-fpm rate of descent, allows the turn from the downwind leg to the base leg to be made with consistency. On the downwind leg, when the aiming point on the runway (the point where the flare is initiated) is midway between the wing tip and the tail, turn onto base.
When the turn from base to final is accomplished with the airplane aligned with the extended centerline of the runway, it is easy to detect wind drift.
Final Approach
Use the same indicated airspeed for a normal approach to landing regardless of density altitude. At high-elevation airports the air is thin. The thin air reduces the lift of the wings, reduces the power output of the engine and reduces the thrust of the propeller. But, the same thin air that affects the aircraft performance also affects the airspeed indicator. There is a built-in compensating factor. Remember the rule of thumb, the true airspeed is approximately two percent per thousand faster than indicated airspeed when flying above sea level.
Although the same indicated airspeed is used and a stabilized approach is used, it will be necessary to use a little more power during the stabilized approach to high-elevation airstrips to have the same rate of descent that is observed at sea-level strips.
Vision is important during the final approach and flare. Let your head assume a normal position. Rather than moving the head back and forth, use peripheral vision, or move the eyes.
When focusing on one spot on the ground, it is difficult to develop an altitude perspective. By slowly and constantly changing the focus from side to side and from the aircraft nose to the horizon, the brain, without one realizing it, chooses a number of points for comparisons. To change focus, move the eyes, not the head. This technique makes it possible to judge the height and movement of the airplane.
The approach speed of 1.3 Vso is used for normal landings. This allows a margin of 30 percent above the stall speed to compensate for maneuvering. The speed should be reduced to about 1.2 Vso for the over-the-fence approach.
Over-the-fence is an expression used to explain the position on final when the aircraft crosses the runway threshold at approximately 20-30 feet AGL and in a position to make a normal landing.
Flare
If the pilot uses attitudes for flying, the flare is easy to accomplish. Ideally, the flare should begin at 10 to 15 feet above the runway. There is a smooth transition from the glide attitude to the level-flight attitude. With reduced power and level-flight attitude, the airplane will begin to settle. As the airplane settles, begin a slow transition from the level-flight attitude to the landing attitude.
The glide attitude, that is, the position of the nose below the horizon, can be maintained and it will result in a constant performance. The airspeed indicator may be covered and with a minimum amount of practice the pilot can fly an exact airspeed, within one knot of that desired.
The level-flight attitude is the position of the nose below the horizon during level flight at cruise airspeed and cruise power setting. It is easy to remember and simulate this attitude.
The landing attitude approximates the normal climb attitude. During climb the nose will be above the horizon. Remember where the horizon intersects the side of the nose cowling for transition to the landing attitude.
Touchdown
The approach and flare are the same whether executing a three-point landing or a wheel landing.
Three-Point Landing
If there were such a thing as a “normal landing” in a taildragger, it would be the three-point landing. For a three-point landing the flare is continued to the landing attitude, that is, the attitude that results in the main wheels and the tail wheel all touching the runway surface at the same time.
Wheel Landing
The wheel landing is different only in the fact that the tail wheel is not as low as the three-point landing attitude. A wheel landing may be accomplished from the three-point landing attitude.
Somewhere along the way during the transition from tricycle gear to convention gear, pilots develop the attitude that they do not have to know the wheel landing. Whether this is an omission in training, or due to hangar flying or wife’s tales, it is a fallacy.
There are two trains of thought concerning the crosswind landing. One is that the three-point landing is preferred because the airplane touches down at the minimum possible speed. This reduces the centrifugal force of swerving. The other is that the wheel landing allows the touchdown at a smaller angle of attack at a faster speed, affording the pilot a safe out by easily making a go-around.
Occasionally, when the approach speed is too fast, the airplane will float along. The wheels are only a couple of inches above the ground, but the airplane doesn’t want to land. Making the airplane land provides moments of excitement or apprehension. A trick that works well in tail draggers (or airplanes with training wheels–singles and twins), is to roll the aircraft slightly to one side or the other with a maximum wing tip deflection of six inches from the level position. This will not work if the airplane is more that several inches above the runway.
After-landing Roll
After the touchdown, it is important to use the ailerons to maintain a wings-level attitude. The nervous student, in a crosswind, often applies full aileron toward the wind once he is on the ground. This increases the ground loop tendency by rolling the plane into the wind and creating a downward force on the upwind tire that leads to extra drag.
Feel what the airplane is doing. Use the ailerons to maintain the wings level. As the airplane slows, the ailerons become less effective. The pilot must use more and more aileron deflection as the speed decreases.
Once on the ground the elevator control should be “sucked into your gut,” that is, it is held back firmly as far as it will go. This places weight on the tail wheel and provides more steering authority. If the airplane touched down in the three-point attitude, moving the elevator control full aft will prevent bouncing or skipping.
EFFECT OF FLAPS
Extracting maximum performance from an airplane is something each pilot can do, no matter what airplane he flies. Flap management is an important factor in obtaining that performance.
Lift and drag are directly proportional. If lift is increased, drag is increased. The addition of the first 50 percent of flaps causes more lift than drag in most airplanes because of the power available.
The addition of the last 50 percent of the flaps causes more drag than lift. During the execution of a go-around, the flaps should initially be retracted to 50 percent. The remaining flaps should not be retracted until the airplane has sufficient speed to sustain flight without sinking or stalling.
If the flaps are retracted prematurely (insufficient airspeed), the lift coefficient of the “clean” wing probably cannot support the airplane.
In making the transition from “dirty” to “clean” configuration, three changes take place:
-
The reduction in camber by flap retraction changes the wing pitching moment—for most airplanes—and requires re-trimming to balance the nose-up moment.
-
The retraction of flaps causes a reduction in drag that improves the acceleration of the airplane.
-
The retraction of flaps requires an increase in the angle of attack to maintain the same lift coefficient. Thus, if airplane acceleration is slow through the flap retraction speed range, lower the nose to increase airspeed before flap retraction to prevent sinking. Consider “milking” the flaps, that is, retract them slowly, a bit at a time.
Flap management requires prior thought on the consequence of flap extension and retraction. Extending flaps causes the following changes to occur:
-
Lowering the flaps changes the camber of the wing, requiring re-trimming to balance the nose-down moment change.
-
Lift and drag are directly proportional. Increase lift and drag increases. The increase in drag requires a higher power setting to maintain a constant airspeed at a constant altitude.
-
The angle of attack required to produce the same lift coefficient is less with the addition of flaps and will cause the airplane to balloon.
Excessive airspeed—above VFE—when lowering flaps for landing, or exceeding the airspeed limitation when flaps are extended, may cause structural damage of the wing.
Flaps for Landing
The FAA created a controversy many years ago when they advocated the use of full flaps for landing, even in crosswinds. They did their best to educate pilots about the benefits of such landings in crosswinds, but did not use all their ammunition.
Some pilots feel a no-flap landing is easier to execute and more controllable. The following information is presented, not in an attempt to convert anyone, but to provide a method for logical experimentation. In this way, the pilot can choose flap or no-flap landings, based upon knowledge rather than myth.
To learn the degree of controllability of an airplane with and without flaps, try this experiment. At some speed less than the maximum flap operating speed, roll the airplane into a 20- to a 30-degree bank. Due to the inherent stability of the plane, it will tend to roll back to wings-level flight without maintaining aileron pressure. While holding the bank constant, extend one-quarter flaps. Then try half-flap and full-flap extension. If the bank becomes noticeable steeper, it suggests the addition of flaps increases the aileron’s ability to control the airplane about the roll axis.
It is true. The airplane has more “air control” with the addition of flaps. It is also true the airplane has less “ground control.” The flaps, being behind the main gear, allow any crosswind to create more weather vane tendency once the airplane is in contact with the runway. This is why some pilots are hesitant to use flaps during crosswind operations.
Proper technique calls for retracting the flaps once on the runway and continuing to fly the airplane on the ground by making crosswind corrections with the ailerons.
When a pilot uses the proper technique of aileron control and flap retraction after the touchdown, the use of flaps will provide for a safer landing in crosswinds. This is due to the decrease in centrifugal force if a swerve is encountered. Centrifugal force increases as the square of the speed where it starts.
Retract the flaps—not the gear—immediately upon becoming established as a ground vehicle. This improves braking ability by placing more weight on the wheels and reducing the natural weather vane tendency.
When the airplane starts to weather vane, a swerve is created. Suppose one has a choice of a touchdown at 70 KIAS without flaps and 50 KIAS with flaps. Seventy squared is 4,900; while 50 squared is 2,500. So any swerve encountered at 70 would be nearly twice as strong as at 50 KIAS.
If an airplane is placarded against slips with flaps extended, it is because the flaps direct the airflow away from the tail. If a slip is initiated, then the pilot makes a rapid recovery to coordinated flight, the tail may stall and the nose may pitch down steeply. For example, slipping to the left causes the right horizontal stabilizer/elevator to be blanked. A rapid recovery causes the left horizontal stabilizer/elevator to be blanked, before the right can gain airflow. With the normal negative lift of the tail removed because of the lack of airflow (stall) the nose pitches down rapidly.
Flaps or No Flaps?
So are you going to use flaps for your landing? That's up to you. Over the years I have developed my personal preference. Winds less than 15 knots, use flaps. Crosswind of more than 15 knots, don't use flaps.
SIMPLIFIED LANDING
It is human
nature to make an excuse for a 'botched,' or at least a
less-than-perfect landing. Excuses are just that. When I find myself
making excuses, it's time to analyze what is happening.
Some instructors advocate that the approach is all-important to making a good landing. Not many pilots will argue this point, but without the proper flare and touchdown, the landing will not be acceptable.
Sometimes a bad approach can result in a good landing—if it does not involve a compromise of safety. For example, appropriate adjustments for being too high or too low may result in a poor approach, yet with the proper flare and touchdown the landing is salvaged.
ATTITUDE - SIGHT PICTURE
Perhaps the
only way to make consistently good landings, especially when flying
different airplane types, involves basic attitude flying; that is,
use the relation of the nose of the airplane to the horizon. When
flying in mountainous terrain with a lack of a horizon, the pilot
must learn to use the base of the mountains some six to eight miles
away as the natural horizon.
To develop the
sight picture of the required attitudes for making a perfect
landing, climb to a safe altitude. First, determine the attitude for
level flight. Look at the horizon and notice where it intersects the
windshield. This will probably be about three to four inches up from
the base of the windshield. Next, learn the attitude for climb at
the best rate of climb airspeed. The horizon will intersect the side
of the cowling below the nose. Memorize the position of the nose
with respect to the horizon for these two attitudes. These are the
level attitude and the climb attitude.
Next, cover the
airspeed indicator, and make the transition from level attitude to
climb attitude. Check the airspeed indicator. If the airspeed is not
within one knot of the best rate-of-climb speed, practice some more.
Change back to level-flight attitude. Check the instruments to see
the indications show level flight.
Practice these
transitions—from level-flight attitude to climb attitude and
back—until the airspeed can be nailed within one knot. It will take
much less time than one imagines, five to 10 minutes at most.
Next, go through a
pre-landing check and establish the normal approach airspeed. Trim
the airplane to maintain the approach airspeed. Learn this
approach (or glide) attitude.
Practice making the flare to level-flight attitude, pause, then
continue the flare to the climb attitude. This practice should be
accomplished with and without flaps.
Move to the
traffic pattern. After making the perfect approach for the landing,
transition to the level-flight attitude at five to 20 feet above the
runway. When sinking is detected, make a slow transition to the
climb attitude. The transition to the climb attitude must be made at
a rate that will not cause a balloon. The climb attitude must be
reached before the actual touchdown, but not while the airplane is
more than one foot above the runway.
Students,
having a hard time developing the perspective on height above the
runway, will find this technique helps establish the viewpoint
necessary for landing.
Experienced pilots will find this technique valuable in eliminating the “thumpers” that inevitably sneak up on us all.
|
|
|